Move to Apple Music

Move to Apple Music Logo

When Apple Music launched nearly three months ago there was only one option to move libraries and playlists from Spotify or rdio and it was cumbersome and time constrained at best. Now that we're nearing the end of the three month trial I've needed to embark on migrating my wife's music from Spotify over to Apple Music so we can cancel Spotify. Her Spotify music library is pretty small at about 1,000 songs spread across 5 playlists but manually migrating them was not what I was looking to spend my weekend doing. Last night I checked to see if there were any new solutions to automate this and was pleasantly surprised to find an app simply called Move to Apple Music.

Migrating Songs

Right off the bat I need to note that Move to Apple Music is only available for Mac. You'll also need to ensure you're running iTunes 12.2 or newer. If you meet the system requirements you're all set. You can test the application out with one playlist and up to 15 songs to see how everything works. After that you'll need to purchase a license for $5 that covers a maximum of two computer installs. The application walks you through the process of authenticating Spotify or rdio, hijacking iTunes and then presenting a list of the playlists from your Spotify or rdio account to select what you want to move. That bit about hijacking iTunes is the secret sauce of the application. You're prompted to love a song that's already in your iTunes library and MTAM (using a local proxy that it has running at this point) uses that traffic as the trigger to tap into Apple Music's API and pull songs from the Spotify or rdio playlists you've marked to migrate, matches them with Apple Music's database and adds those songs to your iCloud music library. I find the whole process very clever and surprisingly effective. The main downside is the speed of the process as there is a 30 second delay per song to avoid overloading Apple's API and getting blacklisted. This equated to seven and a half hours for my wife's initial 800 song migration and will likely take a few days for my 5,000 songs across playlists in Spotify. That still beats the weeks of work it would've taken to do this manually.

Playlist Migration and Unmatched Tracks

The playlist migration is the second (and much faster) part of Move to Apple Music. Once the music has migrated you're given the option to export an XML file that can be imported to iTunes to create those playlists containing the songs that were matched. You're also given an option to export a text document with the songs that weren't matched in the process. In my case this included 25 of 800 songs for Courtney's transfer and I was able to find about 10 these songs manually and add them to the Apple Music library.

Conclusion

Move to Apple Music is the simplest set-it-and-forget-it method to migrate Spotify or rdio libraries to Apple Music. While I focused on the technical details of how the application works I'm thoroughly impressed with its ease of use and reliability on first run. In less than 5 minutes you'll be migrating your music with complete ease. At $5, it's a steal and will save almost any switcher more than that in their time.

Buy it here

Simple Eliminates All Fees

Simple Bank Logo

Courtney and I switched to Simple for our primary banking needs almost two years ago. Today's announcement is another reason we haven't looked back since. Simple is a bank that treats it's customers like grown ups (and I'm a fan of these types of companies). They work to build lifelong relationships that enhance their customer's ability to manage their money in a more responsible way using technology with a human touch. Removing the few (and minimal fees) that they previously had is just another action that proves those intentions.

By the Numbers: Jet vs Amazon Subscribe & Save

Jet vs Amazon Subscribe & Save

08/02/2015 Update: Re-framed this post to reflect monthly items without a one off purchase and provide more context as to the potential Jet has to add savings based on how much you buy at once. Thanks to Reddit user pasttense for the feedback that lead to this re-framing.

Last weekend I discovered a new service for shopping online called Jet through this conversation on Twitter. I was intrigued to see if this new service could compete with Amazon on pricing, specifically for Subscribe & Save items. We’ve used Amazon Subscribe & Save for about two years now to have our staple household items delivered to us on a schedule and (primarily) to save between 5% and 20% off of those items in doing so. The biggest downside for us with Amazon Subscribe & Save as of late is that a lot of the offerings that qualify for the program are bulk size quantities and we’ve moved into an apartment that’s a third the size of our previous home[1]. We just don’t have room for all items to come in bulk orders like we used to and I’m sure we’re not alone in that. After perusing Jet’s site I decided to build our monthly cart and see what our cost differences would be. I’m going to share those differences below in the simplest form, by count.

Items Amazon Jet
Pampers Size 5 Diapers $0.29/diaper $0.23/diaper
Pampers Sensitive Wipes $0.02/wipe $0.02/wipe
Charmin Basic Toilet Paper $0.56/roll $0.29/roll
Puffins cereal $3.95/box $2.51/box
Peter Rabbit Organics Pumpkin, Carrot And Apple Packets $1.75/packet $0.73/packet
Barbara's Morning Oat Crunch Cereal $4.30/box $3.91/box
Tide HE Original Scent, 100-Ounce Bottle $11.05/bottle $8.69/bottle
Peter Rabbit Organics Sweet Potato, Corn & Apple Packets $1.92/packet $1.33/packet
Seventh Generation Natural Fabric Softener $4.98/bottle $4.44/bottle
CoffeeSock Chemex Filter $6.16/filter $5.35/filter
Opti-Free Puremoist Multi-Purpose Disinfecting Solution $8.02/bottle $6.67/bottle
Total (when buying one of each item) $42.99 $34.18
Total savings on monthly items alone $8.82 20.5%

While everything above provides a fair representation of a regular month’s order, there is one last item that I ordered which shows where the real power of Jet kicks in. With Jet, the more you buy the more you (can) save. In this case I ordered a hand mixer as I’ve been making chocolate chip cookies more frequently and our literal hand mixer recently broke which has left me using wooden spoons like an animal. With all of the above items in my cart I received a substantial discount on the hand mixer as you can see below. Adding this to the total calculations adds another 12% to the savings Jet may provide compared to Amazon when purchasing items together.

Hamilton Beach SoftScrape 6-Speed Hand Mixer $38.49 $20.72
Total savings on monthly items with the hand mixer $26.59 32.63%

You can find the calculations behind everything above here. I highly recommend you check it out as there are links to each product along with the breakdown. It was compiled in Soulver.

Comparing Code

I wish that the amount of time I spent compiling the breakdown in cost above was able to stand as a solid argument as to which service was cheaper but the truth is that we live in the age of dynamic pricing . The main difference between buying these products from Amazon or Jet is the algorithm used to give me these prices at the time I went to purchase them. Amazon has long been the master of dynamic pricing with the largest product base at their disposal to continue honing the ability to supply us with giant boxes of Nerds at cut throat prices. Jet admits that dyanamic pricing is their competitive advantage while (wisely) bludgeoning the explanation of their algorithm with Kumail Nanjiani as the jester in their video explaining how the service works.

Overall my experience with Jet has at least gotten me interested enough to continue using it during my free 6 month trial[2] to replace my monthly subscribe and save purchases if it comes out ahead in cost. It’s going to take a lot to untangle my Amazon usage but competition is always a good thing.


  1. Thanks cost of living differences! Chicago costs all of the money to live in while Memphis only costs part of the money.  ↩

  2. Use the promo code lessmayo when signing up to get 6 months instead of the standard 3 month free trial.  ↩

Remove VPN Software Before Upgrading to Windows 10

Being that I spend the majority of my days in front of a PC I'm genuinely excited to start using Windows 10. I jumped on board installing the upgrade yesterday. Unfortunately tomorrow will be my first day of using it due to a mis-step on my part.

If you use any VPN clients (I had 4 installed to cover the variations in networks I work with at my day job) you are best off uninstalling them before making the jump to Windows 10. Most VPN clients adjust network settings or create their own network interface when you install them on Windows. Unfortunately you may get stuck in the same situation that I did if you upgrade to Windows 10 before removing (or ((eventually)) updating) the VPN software where you can't remove it once you're on Windows 10. For me the issue was that my network interfaces weren't present in the network settings of Control Panel even though they were registered with proper drivers in Device Manager. After screwing with the registry (and remembering why I prefer OS X) a colleague pointed out that the VPN software was the most likely culprit. If you're already in the same boat I was, read on for the next steps to get things fixed up and get your Windows 10 fix.

Microsoft has implemented a really handy function in Windows 10 that allows you to roll back to the previous version of Windows you had installed. The main caveats of this function are that you have to use it within 30 days of performing your upgrade and that you'll lose any system changes you've made in Windows 10 since upgrading. To roll back, just follow the steps below.

Downgrade from Windows 10 - Step 1 
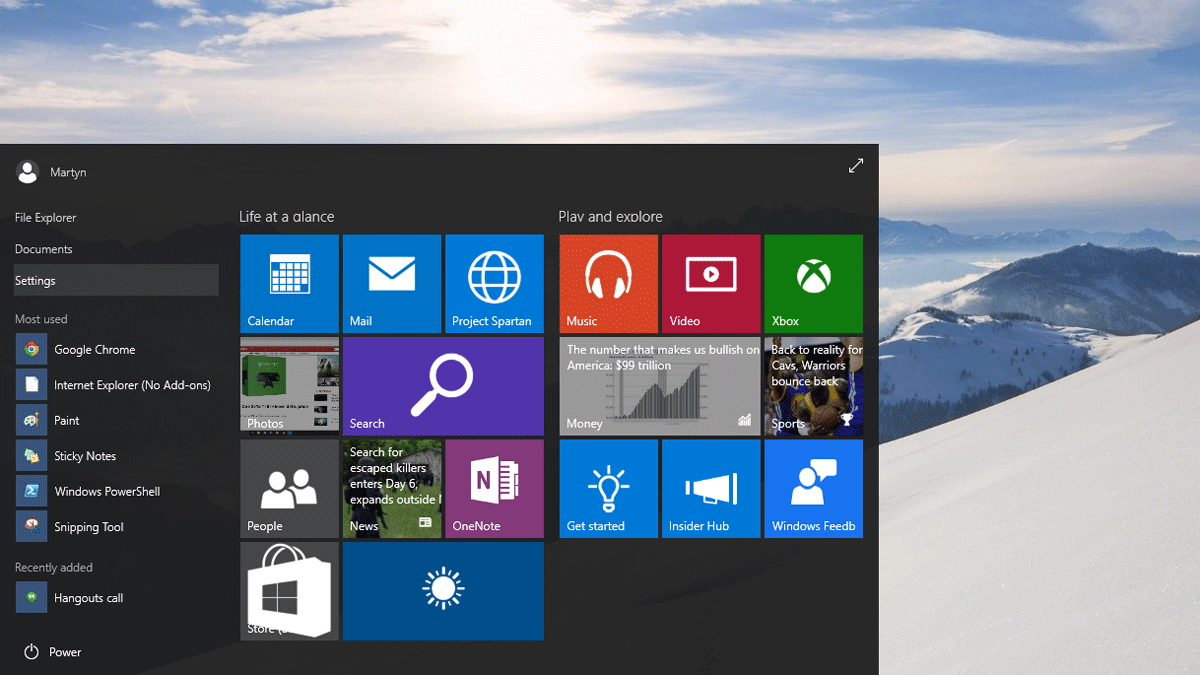
Open the Start menu and click settings

Downgrade Windows 10 - Step 2 
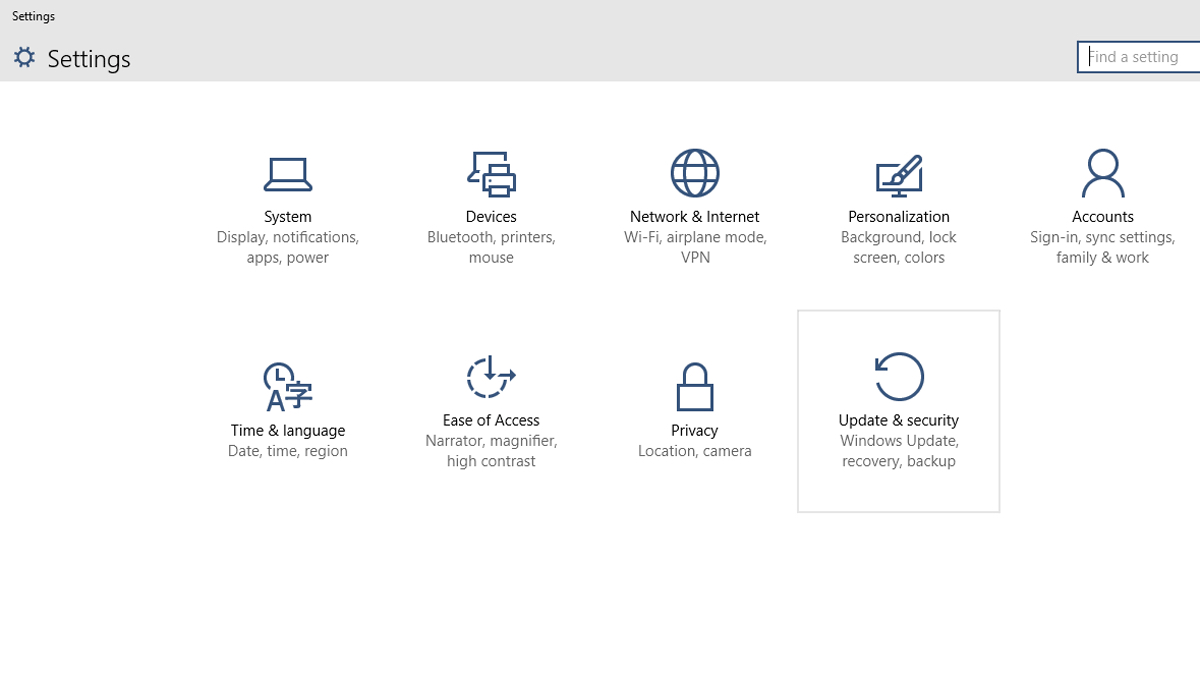
Next, click Update & Security.

Downgrade Windows 10 - Step 3 
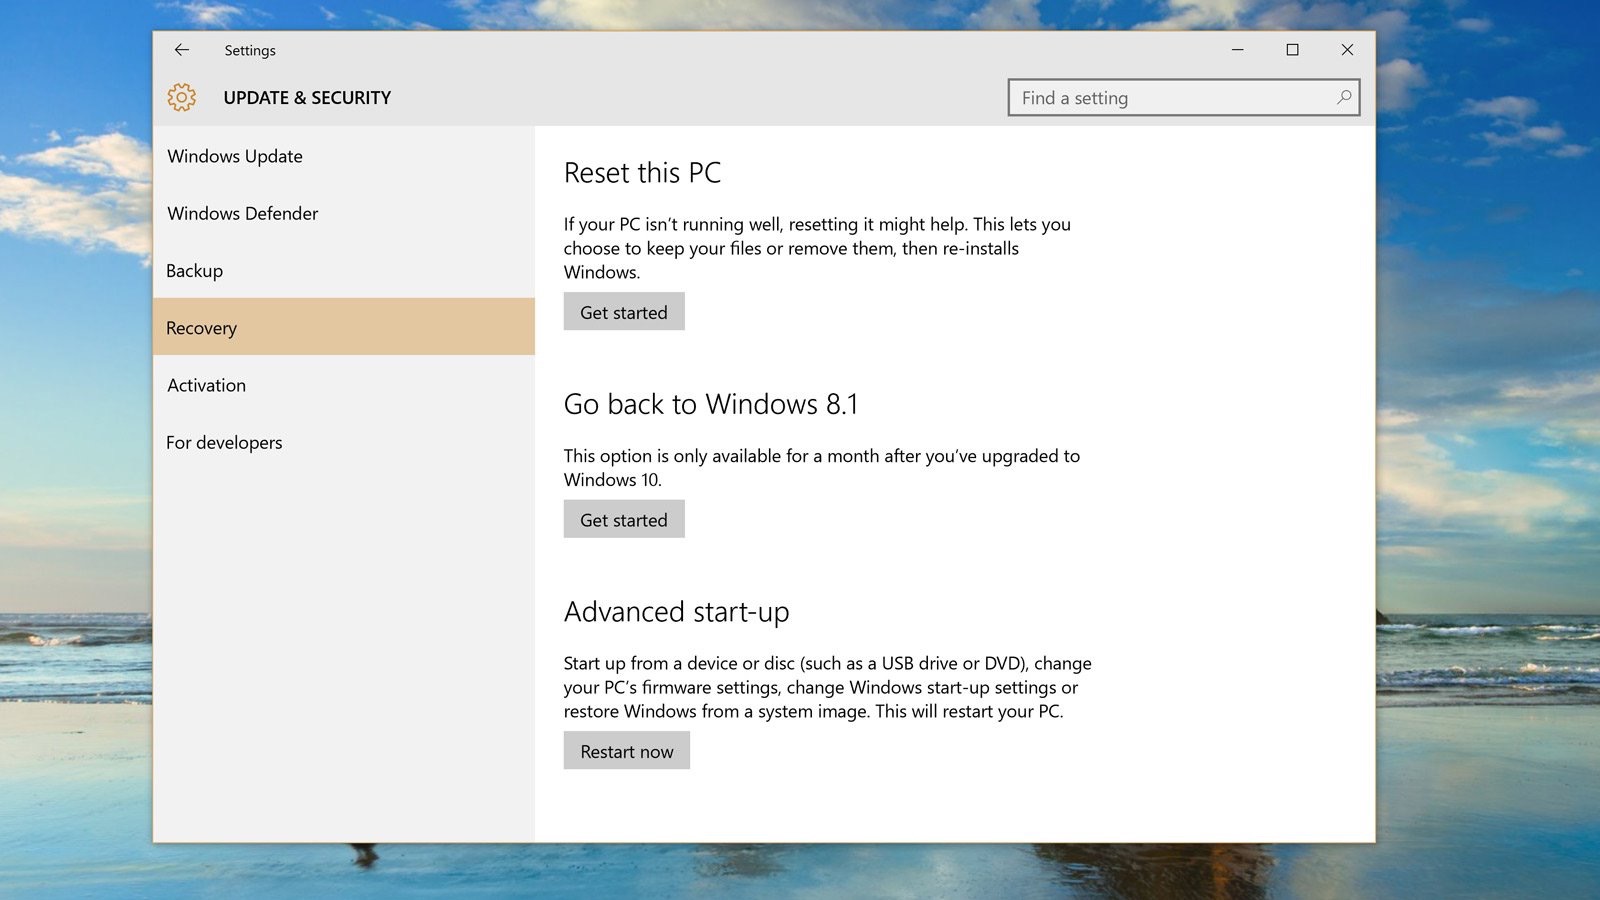
Click Get Started under the Go back to Windows 8.1/Windows 7 option.

Downgrade Windows 10 - Step 4 
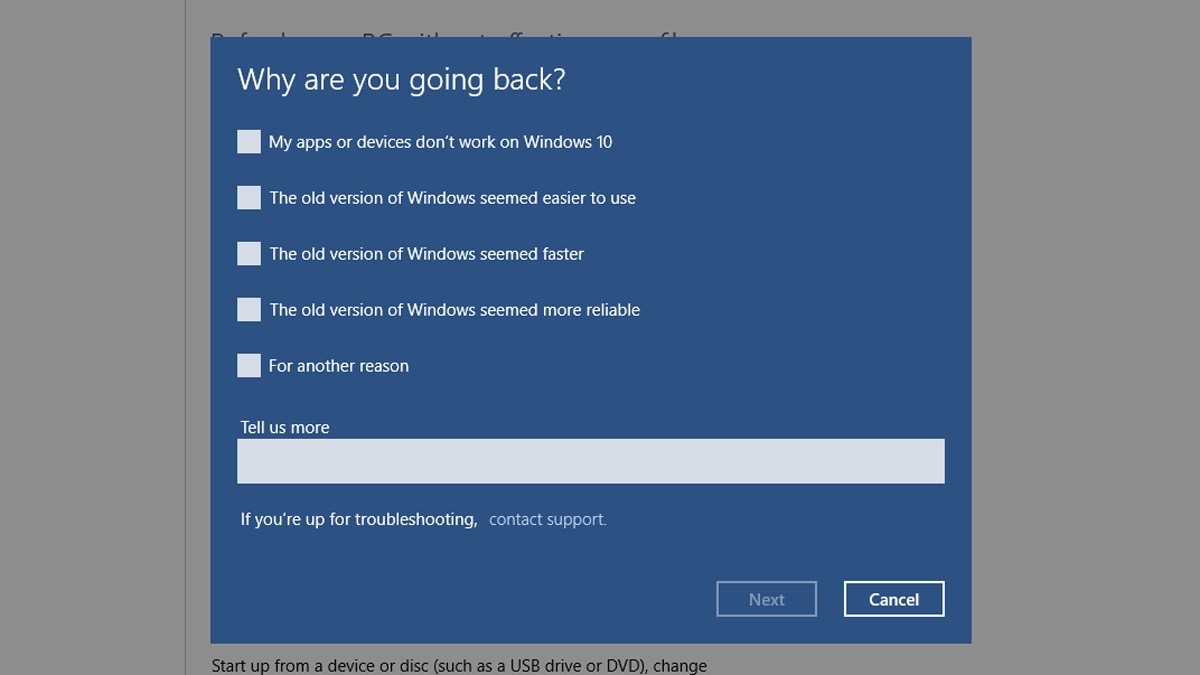
Provide feedback to Microsoft for why your rolling back and click Next.

Downgrade Windows - Step 5 Be sure to read over the caveats for the roll back. Any system changes you've made in Windows 10 will roll back to the way the system was before you upgraded.

The machine will run through a couple of preparation screens and reboot to a roll back screen. Expect this to take about an hour. When it reboots again you'll need to uninstall the VPN software you're using. The biggest culprit I've found online is the Cisco VPN Client. In my case it was the first VPN client I tried to remove and it failed out stating that it couldn't manage network settings and thus couldn't uninstall the program. I would recommend rolling back to remove any VPN software right now to ensure nothing gets borked with the registry. Once you've got the VPN client(s) uninstalled just re-run the upgrade for Windows 10 and you should be all set. If you run into any snags, let me know in the comments!

On Apple's Loss of the Functional High Ground

With Marco Arment's piece on Apple losing the functional high ground gaining widespread visibility this week I find the timing of a recent fiasco with my iPad to be a perfect opportunity to throw in my two cents.

Over the last few months I've been transitioning from being a heavy OS X user to being an iOS only user while my iMac still lives in Memphis during our prolonged transition to Chicago. When I decided to participate in taking a photo-a-day as a part of Project365 I knew that I wanted to ensure that I'd be using our Canon Rebel T3i as my primary camera for these photos. I've long wanted to explore photography further as I find it to be a compelling creative outlet that I've never invested any intentional development of my own skills in and I saw this as a way to try new things with photography over the next year. This excitement prodded me to follow through on an idea I'd been kicking around over the last few weeks. I've enjoyed taking advantage of Sunday mornings as a way to explore downtown Chicago at it's least busiest time of the week. I get downtown by 8a with an area of the city in mind that I'd like to explore and I get to finding new art, food, culture and inspiration all before heading to church. After a few consistent weeks of exploration I had the idea to start documenting these little adventures through photography and posting them to Flickr as a way of sharing what I find. This past week was to include my first photographed Sunday morning adventure in the city. I'd decided to visit the newly opened Maggie Daley Park in the park district of Chicago. I photographed Millenium Park, Cloudgate, the Chicago Theater District and the Jay Pritzker Pavillion on my trek from Do-Rite Donuts & Coffee at Randolph and Dearborn to Maggie Daley Park at Randolph and Columbus. The first real snow of the season had started to fall earlier in the morning and was coming down pretty steadily by the time I'd arrived at the park. I was promptly informed by security that the park was closed due to the icy conditions and that I would accept liability if I continued on. I marched onward and took many photos that would never see the light of day along with a few that just might. After a half hour of walking the park and getting enough photos for one trip I started back to my car. On the way I realized that I still didn't have any way of getting these photos off of the SD card in my camera and onto Flickr. I grabbed a bus to the Michigan Avenue Apple Store to pick up a Lightning to SD card reader and headed back to the car. It was 10:30a and I had all intentions of catching the 11:30a service at Soul City Church. With an hour to kill and rather than leave my gear in my car with the 30° temperature I decided to head to my office at the other end of the block from Soul City and make some headway on importing and uploading the photos to Flickr. I opened the Lightning to SD card reader and plugged it into my iPad with the SD card already loaded. Photos.app automatically opened on my iPad with the option to import the photos. I deleted the photos that wouldn't make the first round of selections and selected roughly 80% of what was left for import onto my iPad. Or so I thought.

I waited while the progress bar marched onward stating that my photos were importing and the green check marks slowly graced each photo in the list to indicate that it had been imported. Once the import completed I noticed that the import tab of Photos.app stated that there were no photos to import. My inner dialogue started to reel about how this could be.

"Where are the 20% of the photos I decided not to import?"
"I'm sure I have them somewhere from a previous import."
"At least I have the new photos I've taken recently."
"Right?"

I checked my photo library on my iPad and found that the photos I'd just imported weren't there. Photos.app was still syncing with iCloud (I've been using iCloud Photo Library for the last few months). I doubted this was the problem but I went ahead and killed Photos.app to see if the photos would appear on a fresh launch. I re-opened Photos.app and found no changes with the library but iCloud still wanted to sync. I re-attached the Lightning to SD card adapter and re-inserted the SD card and found no changes with that either. This was the point that a bit of panic set in. I'd just spent the morning taking photos in anticipation of getting to use my iPad to manage this new project; now I was deflated and concerned that I'd lost my photos. To make matters worse my next steps required me inserting the SD card into my work PC and attempting to find out if the photos were truly lost. Finding that the card had 5GB of space used gave me some relief but as I dug through the card and found nothing listed my stomach dropped again. I did some searching and found a myriad of tools for recovering photos from an SD card. Unfortunately the most recommended application, CardRecovery, cost $40. I wasn't willing to risk a botched attempt to recover my photos with one of the many pieces of crapware that didn't have any reviews or well known sources to vouch for it so I downloaded the evaluation version to make sure it could even find photos on the card first. Once CardRecovery had found the photos I wanted I went ahead and purchased it in order to be able to actually recover the photos. This isn't the experience Apple intended.

Apple actively markets a connected lifestyle that "just works". Sadly, that mantra has been slipping at a faster and faster rate over the last few years due to the churn and burn of Apple's software development cycle. What had started as a simple task I'd like to accomplish in 20-30 minutes had snowballed into something that derailed my morning and cost me money to fix. As someone who supports technology for a living I can understand how some of you might be rolling your eyes thinking "Technology isn't perfect and sometimes it breaks." and to that I say (with all the love in the world) you're being ignorant. I recommend Apple products to my friends and family who want something that just works. The fact that two pieces of hardware, the OS and the native software that Apple made were at the core of my little debacle isn't something I can shrug off. In fact, avoiding the conversation will only contribute to the continuation of this type of experience and ultimately further the erosion of the products many of us depend on and support. Consider those you love who don't want to have to be technical in order to use their Apple products and think of how they would've felt if this had occurred for them. I know my mom wouldn't calmly assess the situation and get to recovering her photos. She would have been crushed and anticipating the worst for her photos. Her content also probably wouldn't have been nearly as miniscule in importance. My concern about the expanding base of issues with Apple's software isn't for the tech crowd. We'll be able to figure out a workaround or fix when something doesn't work as advertised. My concern is for the 90% of users that buy Apple products. Ultimately they have much more of a stake in Apple's future than we do as they're the majority and will vote with their pocketbook.

This isn't meant to be a doom and gloom post about Apple's future but I do have concerns about how the company will deal with these issues. This year will see the release of the Apple Watch which is yet another product that requires resources and will be scrutinized more than the products that are currently experiencing these bugs. I can't imagine that Apple will redirect resources to patch existing issues which may lead to that precious customer sat slipping. Who knows. I just want to be able to import my photos without fear again.

On App Review Mechanisms

Marco Arment on his approach to requesting app reviews from his customers in apps he's developed.

My strategy to get good App Store reviews is simple:

1. Make an app good enough for some people to love it. By nature, you’ll lose some people along the way, but that’s OK: an app that strives to satisfy as many people as possible will usually only get people to kinda like it, not love it.
2. Accumulate a huge surplus of goodwill from those customers with a combination of step 1, usefulness, delight, and adding more functionality over time.
3. Make it easy to rate the app with a button that’s never annoying or in the way, like the Settings screen.

This is one facet of why I love Marco's apps and will choose to use them over others. The passive aggressive “Do you like our app?” which leads to two different options for providing feedback is one of the things that grates on my nerves1 the most in an app. Oftentimes it causes me to leave the app altogether to avoid having to make the right decision to get back to what I was doing in the first place. That's a terrible experience for a customer to have and Marco's advice is solid wisdom to other developers.


  1. I'm looking at you Urbanspoon and MileIQ.